💬 Agent Page
The Agent Page is the main workspace within Kewbot.
From here, agents manage customer conversations, view messages, send attachments, apply tags, and use quick replies or pre-approved templates for efficient communication.
🧭 General Structure
The interface is divided into three main areas, marked in the overview image:
- Sidebar – User info and metrics.
- Conversation List – Displays all active conversations.
- Message Panel – Shows and manages messages from the selected conversation.
(General agent view with areas 1, 2, and 3 marked)
1️⃣ Sidebar (Indicators and User Info)
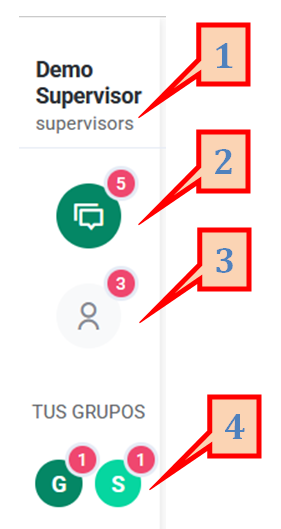
The left sidebar contains user data and activity indicators.
Main elements:
- Logged-in user: Displays the username and active roles (Agent, Supervisor, Administrator).
- Total conversations: Total number of conversations visible in the list.
- Assigned conversations: Number of conversations currently taken by the logged-in user.
- Group distribution: Shows how many conversations belong to each group (e.g., G for “General” or S for “Support”).
These metrics give a quick view of workload and activity within the agent interface.
2️⃣ Conversation List
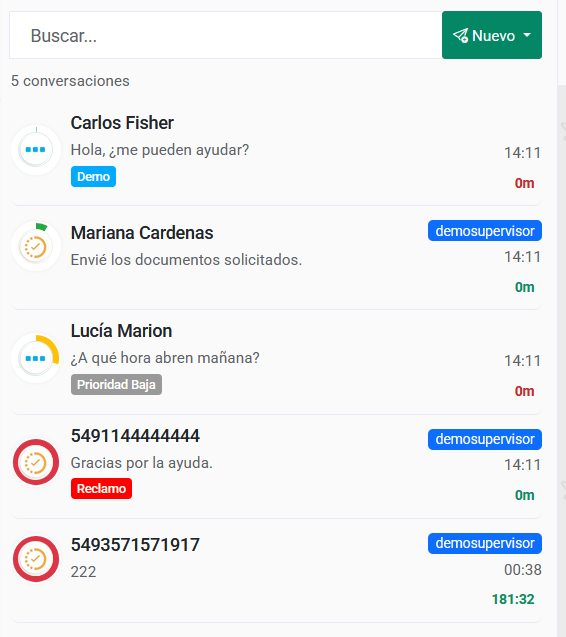
The central panel displays all available conversations.
At the top, you’ll find a search bar and the “New” button, which lets you create new contacts or start new conversations.
🔍 Search
The search bar allows filtering by name or phone number (future versions will include filters by attributes or tags).
🟢 “New” Button
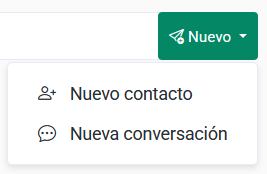
The dropdown New button offers two options:
- 👤 New Contact → opens the form to register a new client.
- 💬 New Conversation → starts a chat with an existing contact.
💬 Conversation Status
Each conversation displays:
- Contact name and phone number (if not in the PhoneBook, only the number is shown).
- A preview of the last message.
- Associated tags.
- Time and elapsed time since the last message.
- Message status: green if waiting for client reply, red if agent’s reply is pending.
🔄 Visual Indicators
- Three blue dots: conversation is free (unassigned).
- Orange check mark: conversation taken by an agent.
- 360° color ring: indicates conversation age:
- 🟢 Green: active window.
- 🟡 Yellow: nearing expiration.
- 🔴 Red: 24-hour window expired.
When a conversation is selected, the right panel shows who currently owns it.
When a conversation is opened, the interface expands to display the full message panel:
3️⃣ Message Panel
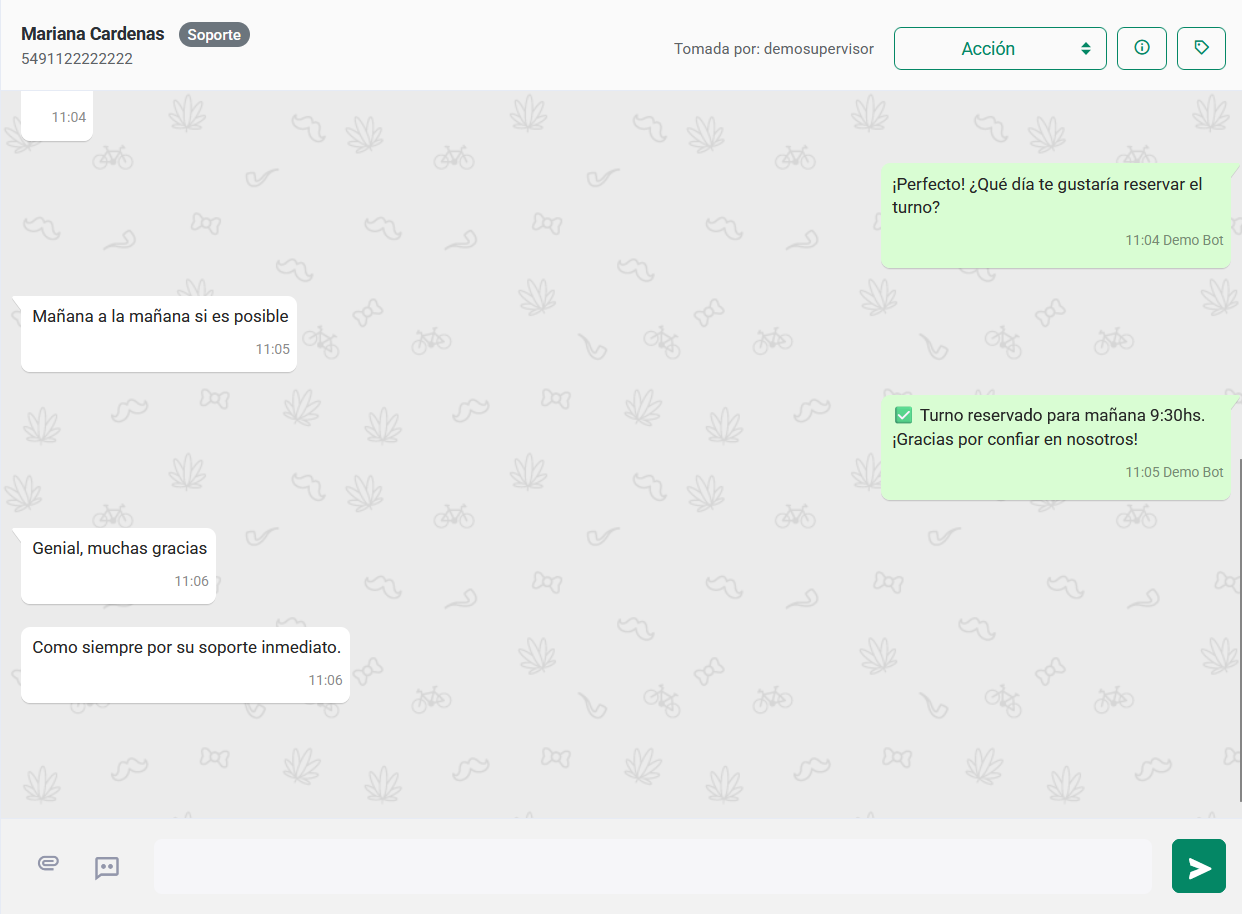
The right panel shows all messages and available actions for the selected conversation.

🔒 Unassigned Conversations
If a conversation is not assigned or belongs to another agent, the system displays:
“You don’t have permission to view this conversation.”
In this case, only the Take Case button is available.
Once the agent takes it, all actions become accessible.
⚙️ Conversation Actions
When a case is taken, the button changes to Action, showing these options:

- ✅ Close Conversation: marks the ticket as completed and removes it from the list.
- 🔁 Transfer: opens a list of available groups to transfer the case to another agent or group.
🧾 Contact Information
The ℹ️ button opens the Contact Information panel, where the agent can edit client data.
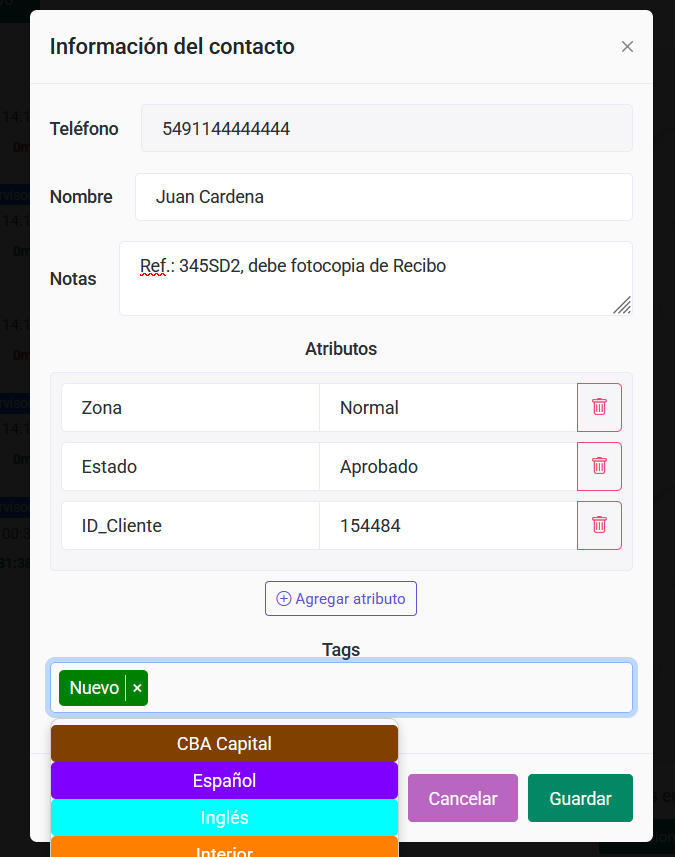
Fields:
- Phone: international format.
- Name: editable.
- Notes: text field for remarks.
- Attributes: key–value pairs (e.g., Zone = Normal, Status = Approved).
Attributes can be used later for filtering or campaign segmentation.
- Tags: labels that classify the client (e.g., language, region, type).
Click Save to confirm changes.
🏷️ Conversation Tags
The tag icon opens the Conversation Tags panel to add or remove tags.
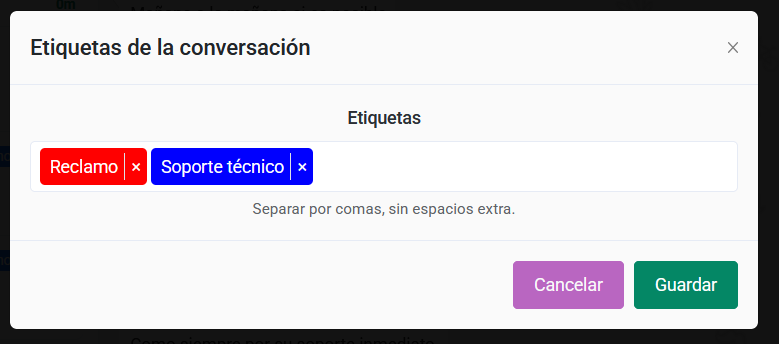
Tags come from a predefined list created by supervisors.
They can later be used for filtering and reporting.
📎 Sending Messages and Attachments
At the bottom of the message panel, the agent can:
- Write messages.
- Attach multimedia files (PDF, audio, video, images).
- Use Quick Replies.
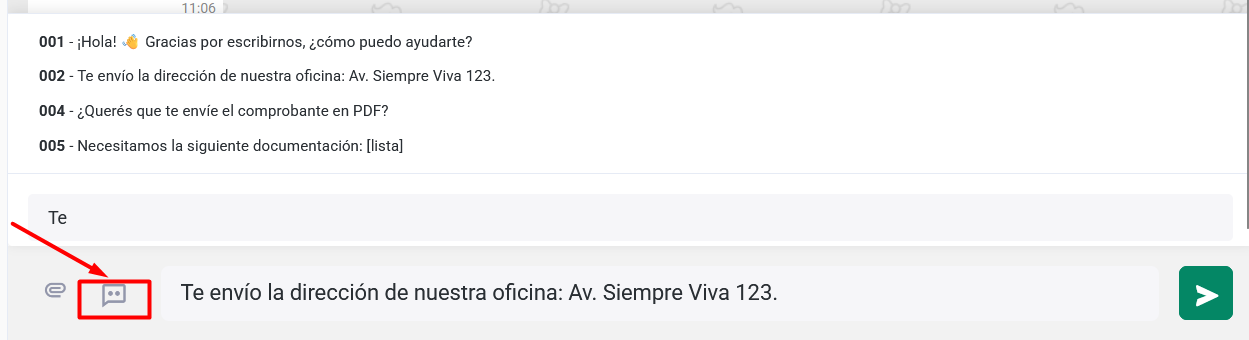
Quick Replies are pre-written messages frequently used by agents.
Clicking one copies it into the input box for editing before sending.
Each group of agents may have its own quick replies, configured by supervisors.
⏰ Out-of-Window Conversations (24h)
After 24 hours without client response, WhatsApp rules restrict free-form messages.

The message appears:
“The 24-hour window has expired. You can only send messages using an approved template.”
A Select Template button opens the list of approved templates.
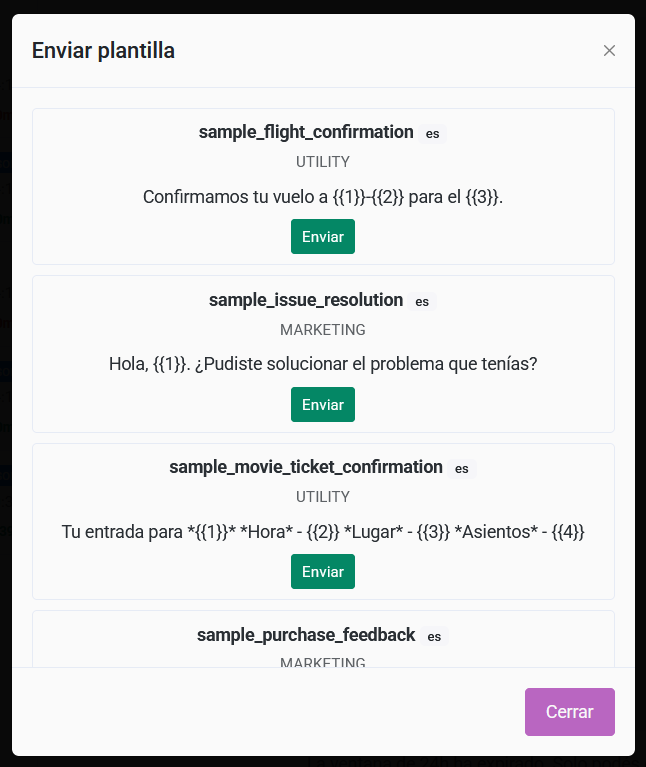
The agent chooses a template, fills in any variables, and sends it to reinitiate contact.
💌 New Conversation / Reconnect with Client
The New Conversation feature allows an agent to start an outbound chat with a client using one of the company’s pre-approved templates.
This enables the agent to reconnect with a client even when the 24-hour messaging window has already expired.
🟢 “New” Button
At the top of the conversation list, there is a green New button that opens two options:
- 👤 New Contact
- 💬 New Conversation
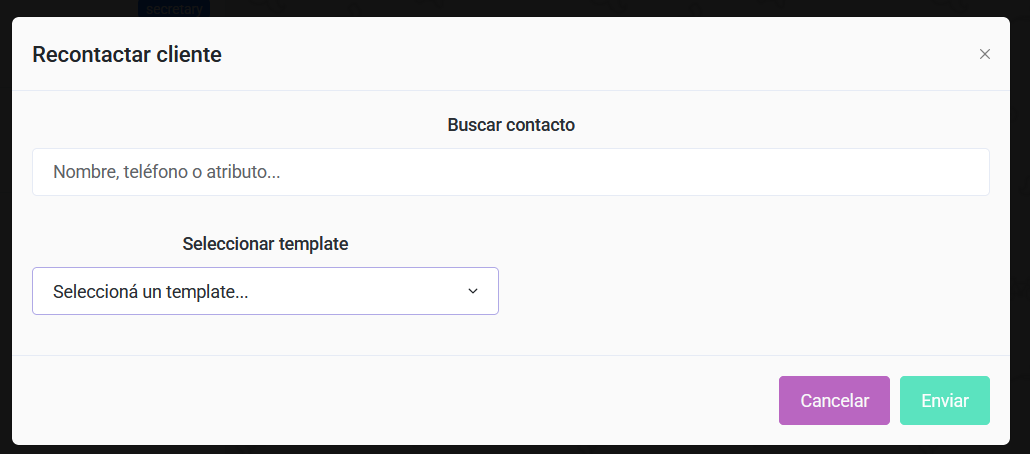
Selecting New Conversation opens a modal window titled Reconnect with Client.

🧩 Reconnection Form
The form is divided into two main sections:
🔍 1. Search Contact
The agent must search for the client’s number or name in the PhoneBook.
⚠️ Only contacts that already exist in the PhoneBook can be used to start a new conversation.
While typing, the system suggests contacts that partially or fully match the query.
Once selected, the form automatically displays the client’s stored details from the PhoneBook:
- Name
- Phone number
- Client ID
- Notes
- Attributes (e.g., Zone, Status, Profile)
This allows the agent to confirm the identity of the contact and view any relevant information before sending the message.
🧾 2. Select Template
After choosing the contact, the agent must select one of the company’s approved templates.
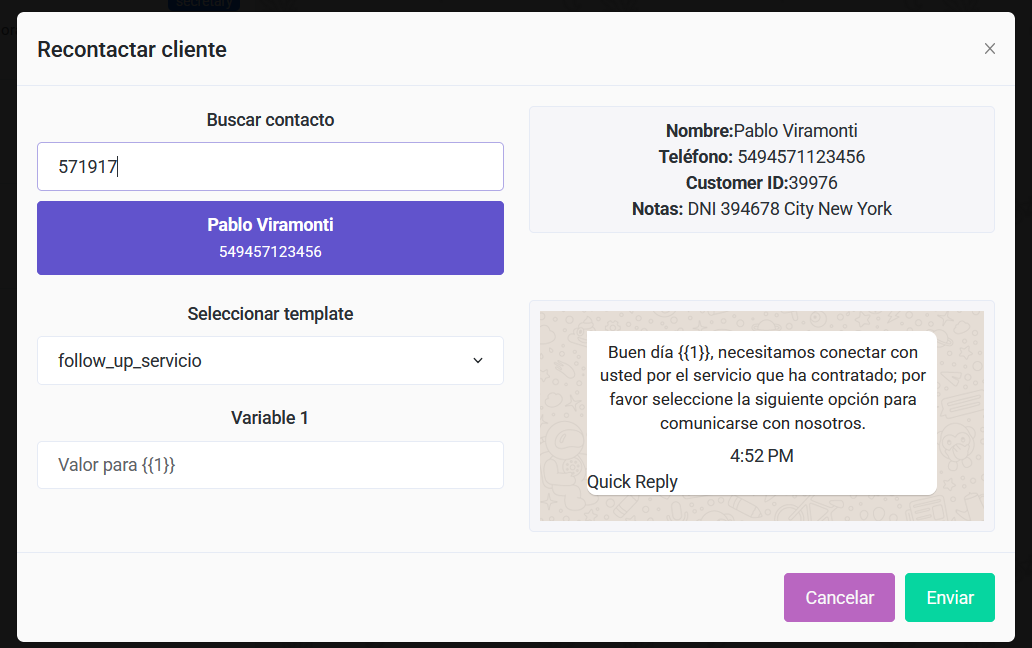
When a template is selected:
- A preview of the outgoing message appears.
- If the template includes variables ({{1}}, {{2}}, etc.), text fields are automatically generated for each.
- The preview updates dynamically in real time as the agent fills in the variable fields.
🚀 Sending the Message
Once all variables are completed, the agent clicks Send.
The system performs the following steps:
- Sends the message to the selected number.
- Automatically creates a new outbound conversation linked to the agent and their group.
- Displays a visual confirmation when the message is sent successfully.
- Logs the action as an outgoing conversation event in the history.
🗂️ Result and Tracking
The new conversation appears immediately in the main conversation list, under the agent’s group.
From there, the agent can view the sent message, wait for the client’s reply, or close the conversation if no response is received.
📊 The entire process is recorded in system reports as an outgoing conversation event,
enabling full traceability and performance analysis.
✅ Typical Agent Workflow
- Enter the agent panel.
- Search or filter a conversation.
- Take the case.
- Review client info.
- Add or edit tags.
- Reply with messages, attachments, or templates.
- Close or transfer the case.