Campaigns
The Campaigns module allows you to send mass or automated messages to a list of contacts, using templates pre-approved by Meta. Each campaign can be created manually through a guided wizard, or triggered automatically from an external system via API.
Before creating a new campaign, it is recommended to verify that all templates are up to date, as they define the content, buttons, and parameters used in the message.
Campaign list
The main view displays the general list of campaigns, along with aggregated indicators of recent activity.
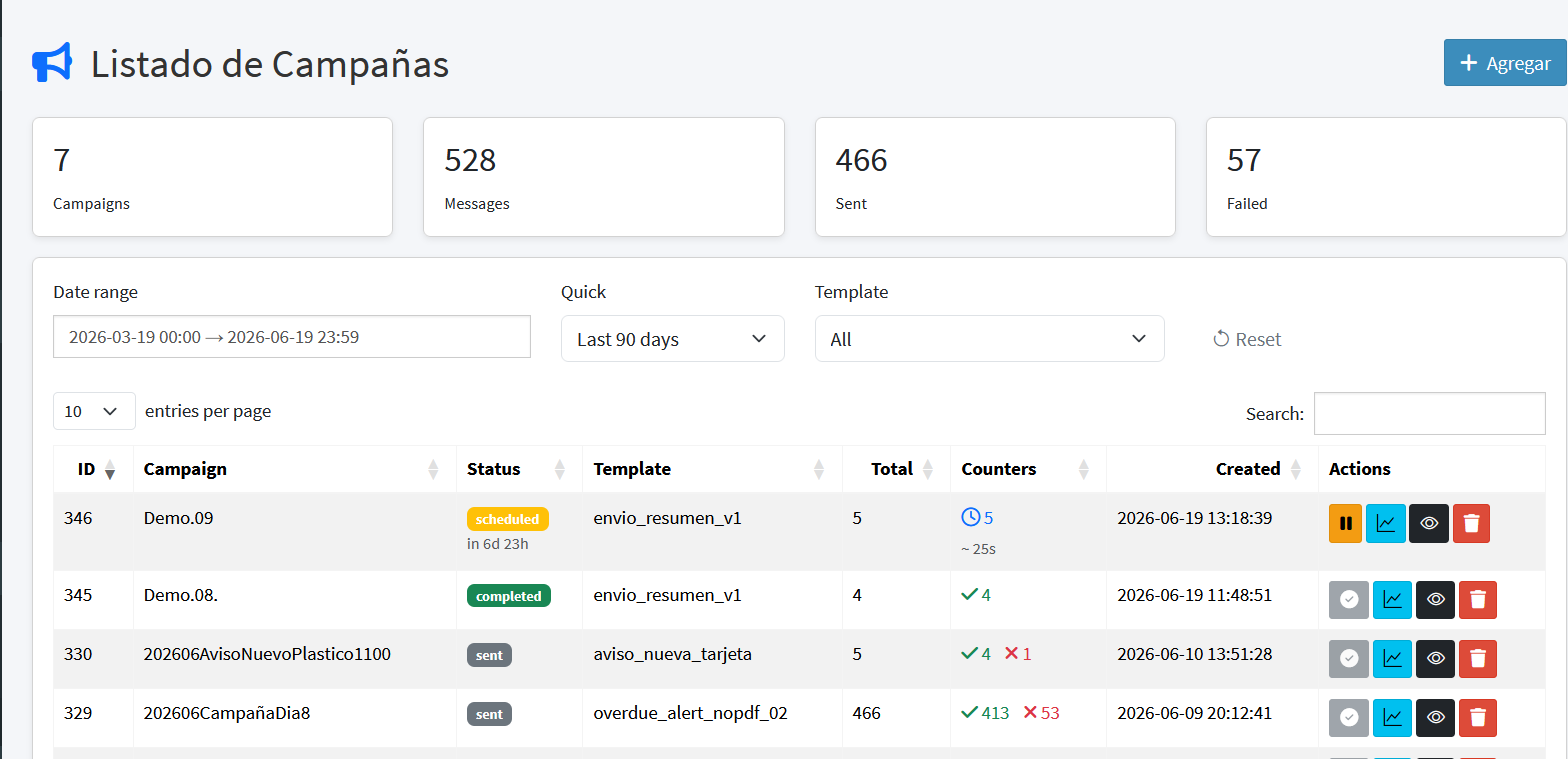
Four general counters are shown at the top:
| Indicator | Description |
|---|---|
| Campaigns | Total number of campaigns in the filtered period. |
| Messages | Total number of registered messages. |
| Sent | Successfully sent messages. |
| Failed | Messages that could not be delivered. |
Filters
The list can be filtered by:
- Date range — campaign creation date range.
- Quick — predefined shortcuts (e.g., Last 90 days).
- Template — restricts the list to campaigns that used a specific template.
List columns
| Field | Description |
|---|---|
| ID | Unique campaign identifier. |
| Campaign | Descriptive name of the campaign. |
| Status | Current lifecycle state (see status table below). |
| Template | WhatsApp template used for the send. |
| Total | Total number of recipients loaded into the campaign. |
| Counters | Visual summary of sent, pending, and failed messages. If the campaign has pending records, an additional indicator shows the estimated time to complete the send, calculated in minutes and seconds. |
| Created | Date and time the campaign was created. |
| Actions | Campaign control buttons (see below). |
Campaign statuses
| Status | Description |
|---|---|
| scheduled | Scheduled for a future date and time. Shows a countdown until the send begins. |
| sent | Currently sending or with sends already executed. |
| completed | All records have been processed (sent or failed). |
| pending | Loaded but not yet started. |
| idle | API campaign waiting to be triggered externally. |
| paused | Manually paused; can be resumed at any time. |
Actions available per campaign
- Start / Pause — controls execution of the send at any point in the lifecycle.
- View analytics — opens the Campaign Analytics panel.
- View contact list — opens the Campaign Inspector with the detail of each recipient.
- Delete — removes the campaign (not available once it has sent messages; see Protection of sent data).
If a scheduled campaign is paused, the scheduled date can be freely modified from the Campaign Inspector. When resumed, the system honors the new configured date without needing to reload the data.
Creating a campaign
The + Add button lets you create a new campaign, with two modes:
- Upload from file — guided import wizard (CSV Wizard).
- API Campaign — externally triggered campaign.
Import wizard (CSV Wizard)
Manual campaign creation is done through a 5-step wizard: Template → File Selection → Validation → Column Mapping → Result.
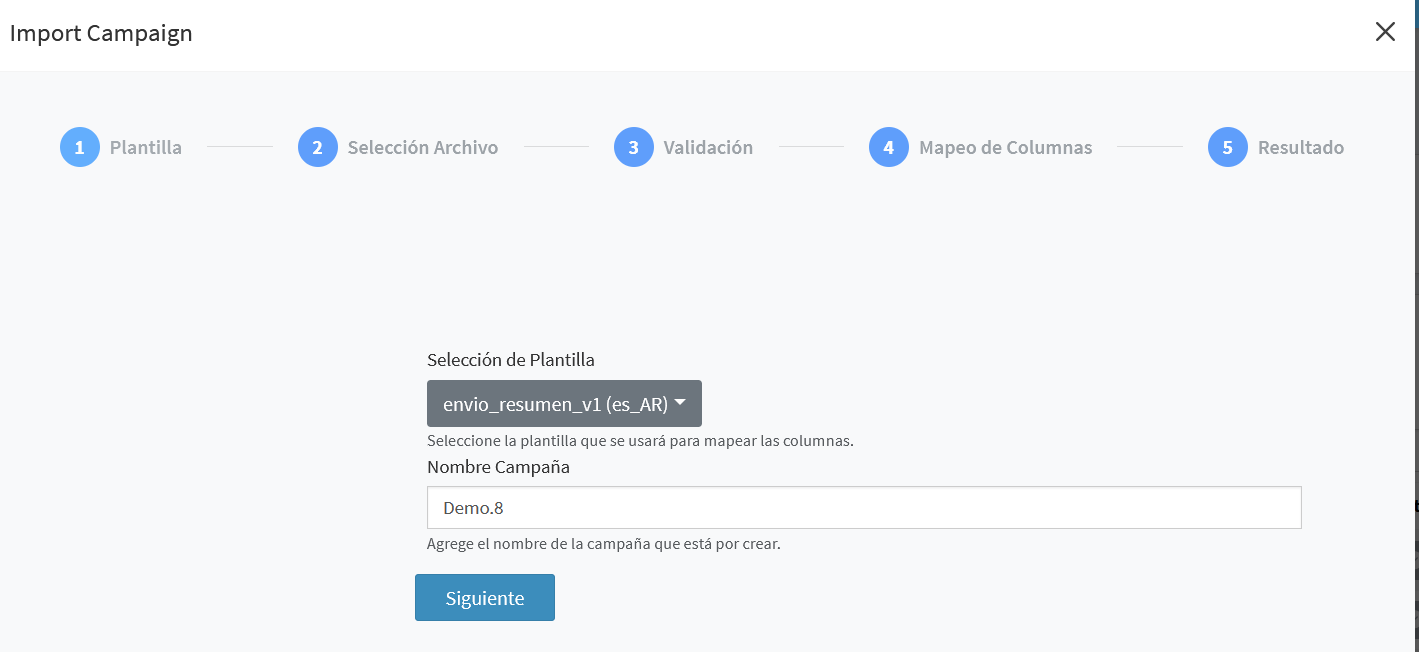
Step 1 — Template
This step defines the campaign's base configuration:
| Field | Description |
|---|---|
| Template Selection | The Meta-approved template that will be used for the send. |
| Campaign Name | Descriptive name used to identify the campaign in the list. |
The option to automatically save numbers to the PhoneBook was removed from this step. The PhoneBook is now managed independently from its own module.
Step 2 — File selection
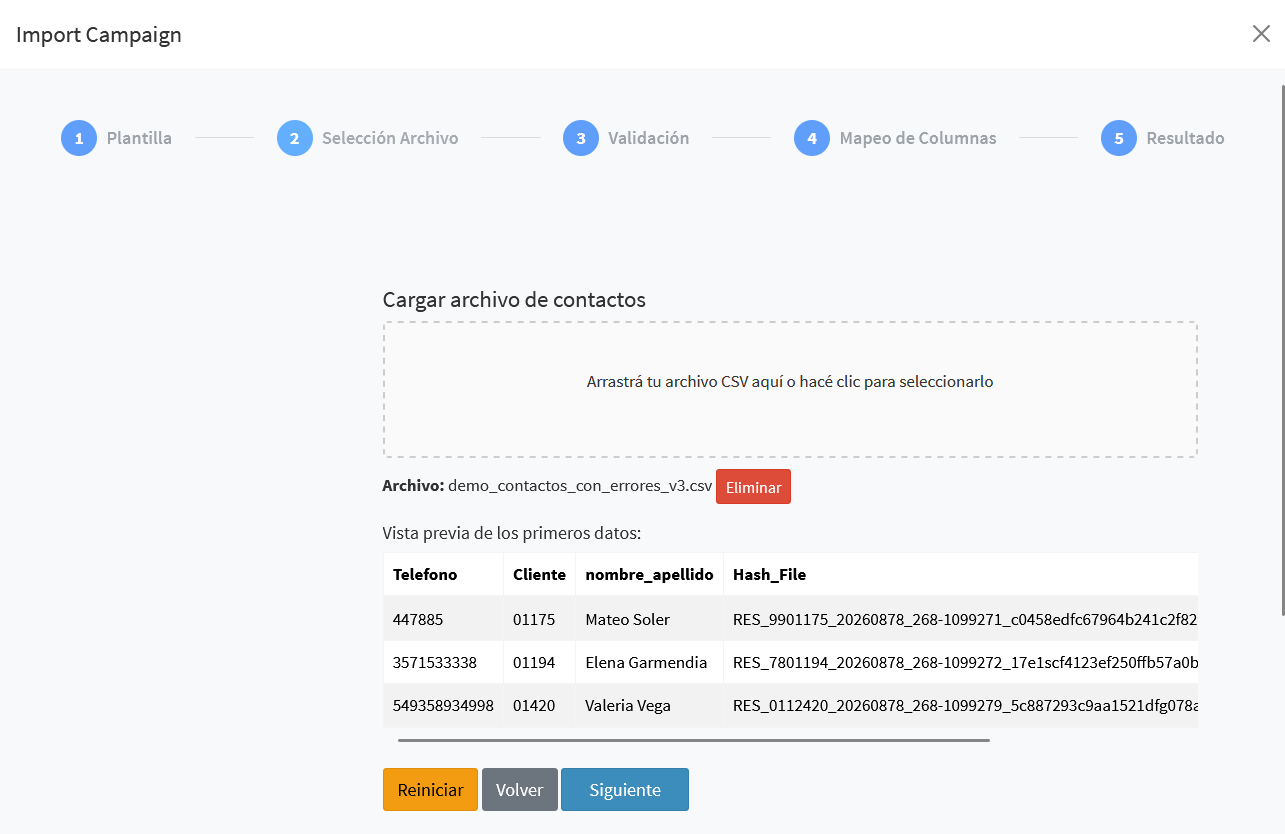
A .csv file is uploaded by dragging it into the drop area or selecting it manually.
File requirement: the first line of the CSV must contain the column headers (field names). This makes the subsequent column mapping clearer and more reliable, since the system uses these headers to identify each field instead of numeric positions.
The system displays a preview of the first records in the file to confirm the structure is correct before continuing.
Step 3 — Validation
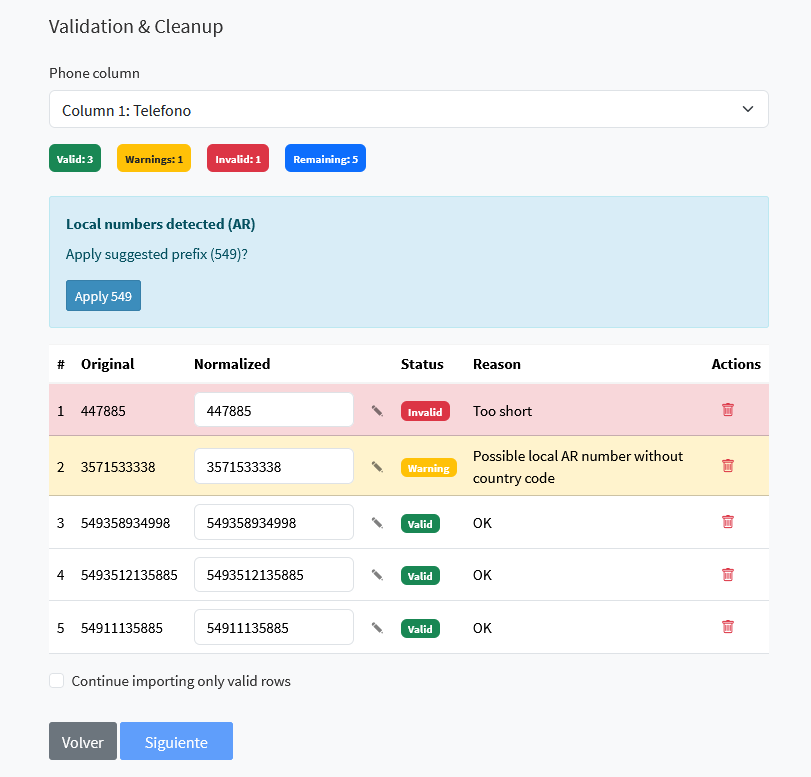
This step automatically analyzes the selected phone column and classifies each record.
| Counter | Meaning |
|---|---|
| Valid | Correctly formatted numbers, ready to send. |
| Warnings | Numbers that likely need adjustment (e.g., a local number missing the country code). |
| Invalid | Numbers that cannot be processed as they are. |
| Remaining | Records not yet reviewed or corrected. |
For each record with a warning or error, the system displays the reason (for example: "Too short", "Possible local AR number without country code").
Tools available in this step:
- Apply [prefix] — when the system detects local numbers missing the country code, it suggests and allows applying the corresponding prefix (e.g.,
549for Argentina) to all affected records with a single click. - Manual editing — each number can be corrected directly in the "Normalized" column using the edit icon.
- Remove record — removes a specific record from the import.
- Continue importing only valid rows — allows proceeding while ignoring invalid records, which will be excluded from the campaign.
- Duplicate detection — the system flags records that are repeated within the same file.
Step 4 — Column mapping
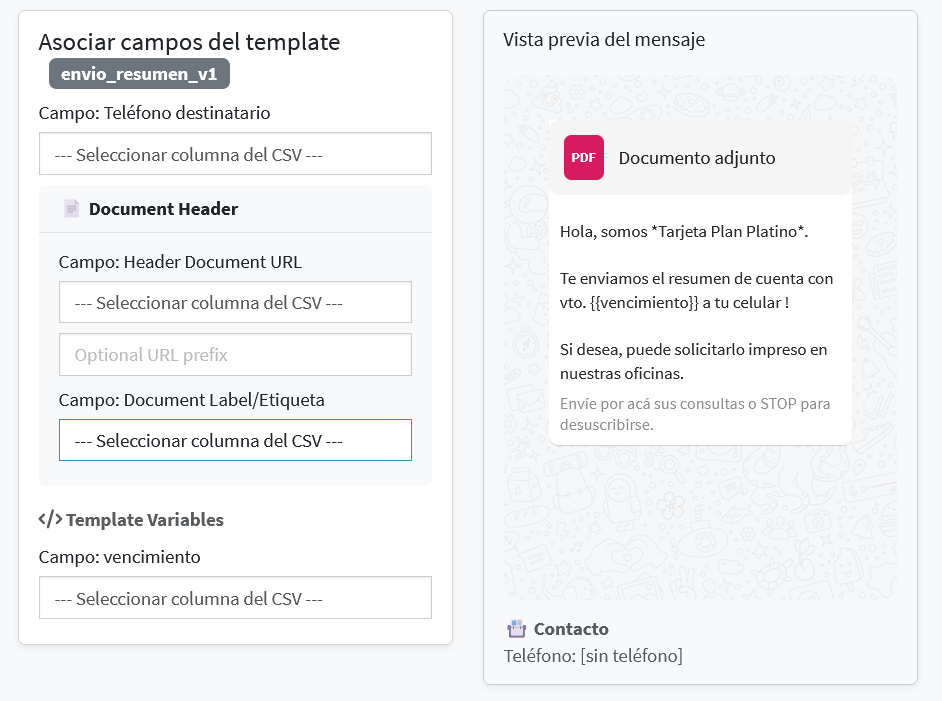
In this step, template fields are matched to the CSV columns. As mappings are completed, the message preview updates in real time, including the contact, the attached document (if applicable), and the buttons.
Each template field can be filled in three different ways:
| Value source | When to use it |
|---|---|
| CSV column | The value varies per recipient (name, amount, date, customer ID, etc.). |
| Constant value | The value is the same for every recipient in the campaign (e.g., a general due date). It is typed directly into the field instead of selecting a column. |
| CSV column + URL prefix | For dynamic header fields (document, image, or video), where the full URL shares a fixed base and only one identifier changes. |
Dynamic headers with media files
Templates with a dynamic header (PDF, image, or video) require a complete URL per recipient. Instead of having to build or repeat that full URL in every CSV row, the mapping allows it to be split into two parts:
- CSV field — the variable part of the URL (e.g., the document ID or hash).
- URL prefix (optional) — the fixed part that is automatically prepended to each CSV value.
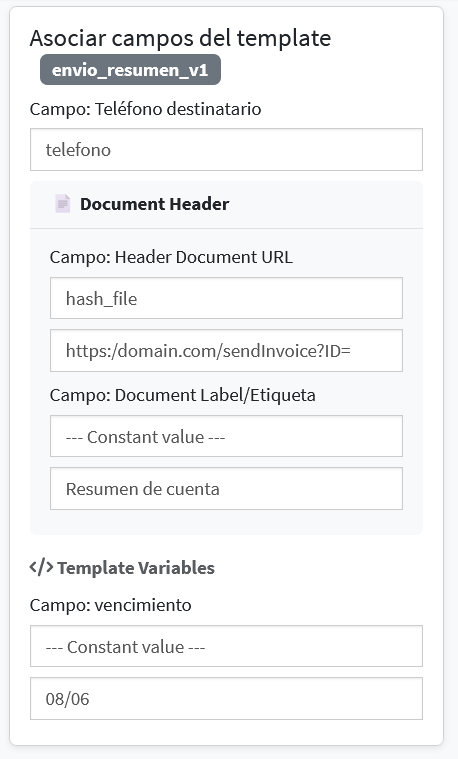
For example, if each customer's document is available at:
https://www.domain.com/sendInvoice?ID=RES_0145552_20260878_268-1099280_ccd8f01ebaeef66cd225ac67312e6d003c6846cd
The CSV only needs to contain the column with the variable value (Hash_File), and the prefix https://www.domain.com/sendInvoice?ID= is defined once in the mapping, applying automatically to every record.
In addition to the URL field, these headers include a Document Label field, which defines the visible name shown next to the document icon in the message received by the customer. Like the other fields, the label can be pulled from a CSV column (for example, to display "Invoice_January.pdf" with each file's actual name) or set as a constant value when every send shares the same label (for example, "Account statement").
In the message preview, clicking the document icon opens the demo URL, allowing you to confirm the PDF, image, or video is being pulled correctly before launching the campaign.
Step 5 — Result
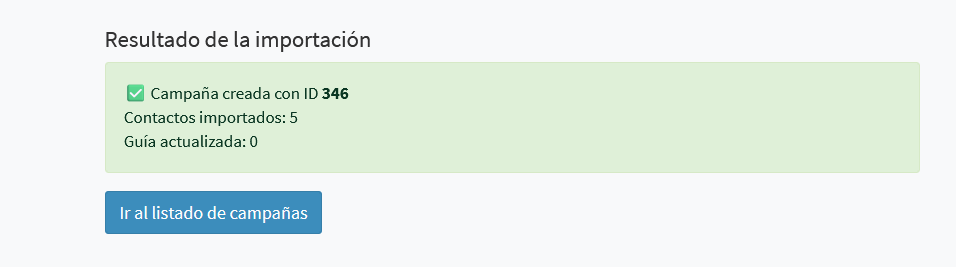
Upon completion, the system confirms the campaign was created and shows:
- The generated campaign ID.
- Number of contacts imported.
- Number of records used to update the phonebook (if applicable).
From here you can go directly to the general campaign list.
API Campaign
It is also possible to create automated campaigns controlled by an external system.
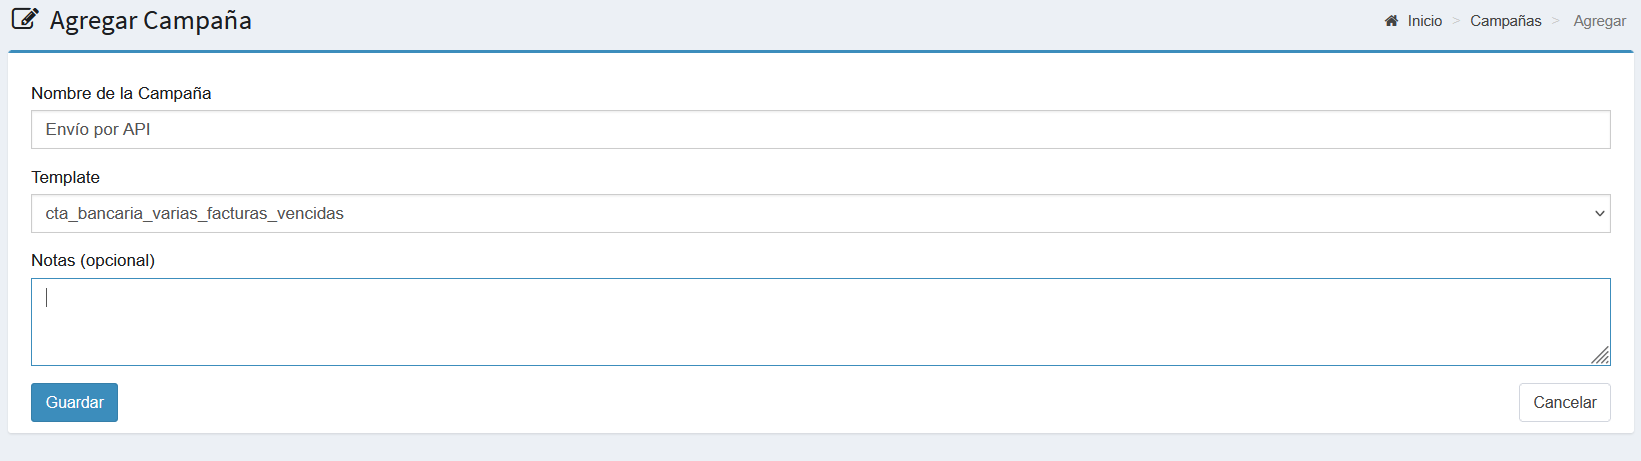
This type of campaign requires three fields:
- Campaign name
- Template to send
- (Optional) Notes
The campaign remains in idle status. An external system can then call the Kewbot API, sending:
- Security token
- Campaign name
- Recipient phone number
- Template parameters
If any parameter is missing or invalid, the API returns an error. This allows an external system to automatically trigger sends after certain events (customer signup, due date reminders, appointment confirmations, etc.). See the API Integration documentation for the technical details of this flow.
Scheduling sends
A campaign can be scheduled to run at a future date and time, instead of starting the send immediately.
This allows, for example, preparing a campaign on a Friday that should go out first thing the following Monday, without anyone needing to be present at send time.
Scheduled campaigns can also be paused and rescheduled freely. For example: a campaign that started sending on a Friday can be paused at the end of office hours, rescheduled for Monday morning, and will automatically resume from that point without further intervention.
Campaign Inspector
The contact list button opens the Campaign Inspector, with the complete detail of every campaign recipient.
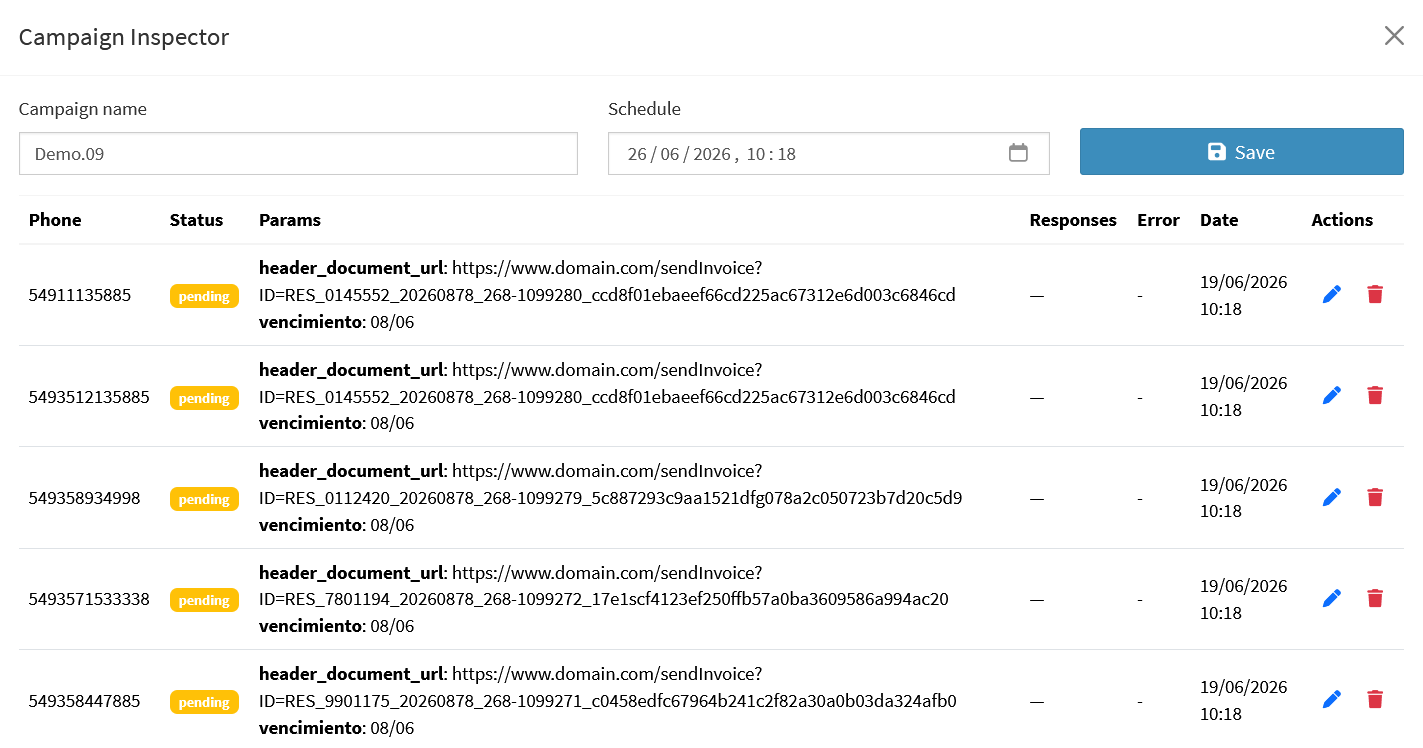
From the Inspector header you can edit:
- Campaign name — the campaign's name.
- Schedule — the date and time the send is scheduled for.
The recipients table shows:
| Column | Description |
|---|---|
| Phone | Recipient's number. |
| Status | Individual send status (pending, sent, delivered, read, failed). |
| Params | Values applied to each template field for that specific recipient. |
| Responses | Response or button selected by the customer, if any. |
| Error | Reason for failure, if the send could not be completed. |
| Date | Date and time of the record. |
| Actions | Edit or delete the individual record. |
Protection of sent data
Once a message has actually been sent, its record cannot be modified or deleted. This guarantees the consistency of reports, auditing, and response tracking over time.
Records still in pending status, or that failed, can be edited (for example, to fix a phone number) before being resent.
Campaign Analytics
The analytics button opens the Campaign Analytics panel, with the consolidated result of all sends in the campaign.
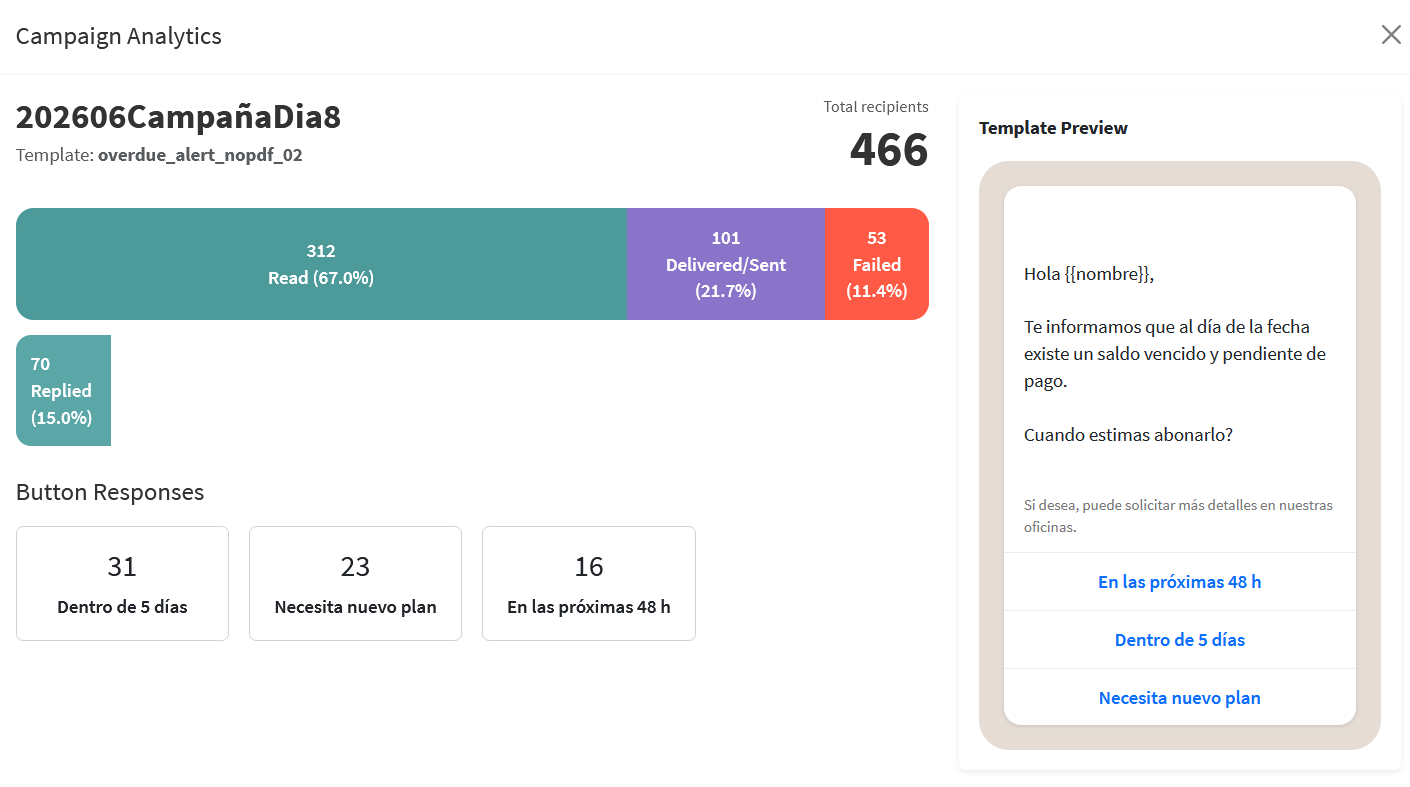
The panel includes:
- Total recipients — total number of recipients in the campaign.
- Results funnel — distribution between Read, Delivered/Sent, and Failed, with percentage of the total.
- Replied — number and percentage of recipients who replied to the message.
- Button Responses — if the template includes buttons, shows how many times each one was selected.
- Template Preview — preview of the exact message that was sent, including text and buttons.
When a campaign does not yet have any recorded activity, the panel clearly indicates this instead of showing empty charts.
Sending speed
The time interval between each message in a campaign is configurable per company from Company Settings, within the Campaigns parameter group:
"Minimum time between campaign messages. Allowed value: 500 to 60000 ms."
This parameter allows the send pace to be adapted to each client's operational needs or to WhatsApp account restrictions.
In the campaign list, while pending records remain, this same value is used to calculate the estimated completion time, multiplying the number of pending messages by the configured delay. The indicator updates as the campaign progresses.